 347-797-1671
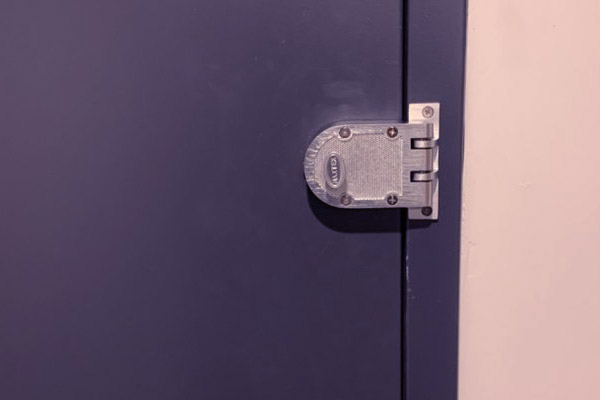
HOW TO REPLACE A JIMMY-PROOF LOCK
When it comes to home security, a jimmy-proof lock holds a crucial position. Nicknamed for its resistance against ‘jimmying’ or forced entry attempts, this unique lock design often secures homes and businesses worldwide.
A jimmy-proof lock interlocks it with the jamb bracket, making it difficult to force open from the outside. Here’s a step-by-step process of replacing a jimmy-proof lock, ensuring you can maintain this paramount security system component.
By keeping your jimmy-proof lock in good working condition, you ensure your property’s safety and gain peace of mind. Let’s delve in and unlock the process.
TYPES OF JIMMY-PROOF LOCKS
There are several types of jimmy-proof locks available in the market, each with its own unique characteristics and level of security:
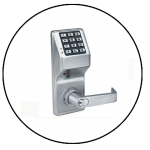
Single Cylinder Deadbolt: This is the most common type of jimmy-proof lock. It requires a key to unlock from the outside, but a thumbturn can be used from the inside.
Double Cylinder Deadbolt: In contrast to the single cylinder, this type requires a key to unlock from both the outside and the inside. This provides an additional level of security but can potentially pose safety issues in emergency situations.
Vertical Deadbolt: This lock variant is particularly resistant to forced entry but is more challenging to install. The deadbolt interlocks with a set of cast iron rings, making it difficult for intruders to pry open.
Mortise Lockset: A mortise lockset is installed inside the door itself. It’s considered highly secure but requires precise installation. It often features a classic design, making it a popular choice for historic or high-end properties.
Rim Latch Lock: Popular in apartments and double doors, rim latch locks are installed on the interior side of the door and automatically lock when the door is shut.
Remember, the best lock for your property depends on your specific needs and circumstances. Always consider factors such as potential threats, door type, and local regulations.
TOOLS NEEDED FOR REPLACEMENT
Before you proceed with the replacement, ensure you have the necessary tools at hand. Here are the key tools you’ll need:
New Jimmy-Proof Lock: First and foremost, you’ll need a new Jimmy-proof lock. Ensure it’s the correct type for your door and security needs.
Screwdriver: A screwdriver is necessary for removing and installing screws during the process. You’ll likely need both Phillips and flathead types.
Drill: A power drill can be used to create new holes if needed. Ensure you have appropriate size drill bits for your lock’s screws.
Tape Measure: This is useful for precise positioning of the lock and to ensure correct alignment.
Pencil: A simple pencil is handy for marking drill points accurately on the door.
Level: A level ensures that your lock is installed straight, enhancing its effectiveness and overall appearance.
Remember, always prioritize safety when using these tools. Wear protective eyewear, and if you’re uncomfortable or unsure at any point, don’t hesitate to seek professional help.
STEPS TO REPLACE A JIMMY-PROOF LOCK
To replace your jimmy-proof lock, follow the steps given below:
Remove the Old Lock: Start by unscrewing the old lock using a screwdriver. Keep the screws in a safe place for later use. Once all screws are removed, carefully take off the lock from the door.
Measure and Mark: Using a tape measure, you can easily determine the position of the new lock. Make sure it aligns with the keyhole and other necessary points on the door. Mark these points with your pencil.
Drill New Holes (if necessary): If your new lock doesn’t match the existing holes, you will need to drill new ones. Use your power drill to make holes at the points you marked, following the new lock’s instructions to ensure they are the correct size.
Attach the New Lock: Position the new lock against the door and align it with the holes. Insert your screws and tighten them with your screwdriver. Make sure not to overtighten as it could damage the lock or door.
Test the Lock: Once the lock is installed, test it with the key from both inside and outside the door. The key should turn smoothly, and the door should open and close without issues.
Check the Level: Finally, place your level on the lock to ensure it is straight. If not, adjust by loosening the screws slightly, repositioning the lock, and then retightening the screws.
And there you have it: your new Jimmy-proof lock is installed! Always keep a spare key in a safe place, and consider giving an extra key to a trusted neighbor or family member for emergencies.
HOW TO INSTALL A NEW JIMMY-PROOF LOCK
Follow the steps below to install your new jimmy-proof lock effectively:
Prepare the Door: Start by removing any debris or dust from the door surface where the lock will be installed. You want a clean surface to ensure a secure fit.
Mark the Lock Position: Hold your new lock against the door at the desired height. Using your pencil, mark the keyhole position and the screw holes onto the door. Ensure the lock is level and straight.
Drill the Holes: Using your power drill and the appropriate-sized drill bit, drill holes where you’ve marked. Remember, always drill straight, and do not force the drill.
Insert the Lock: Align your new lock with the drilled holes. Feed the bolt through the keyhole and align the lock.
Secure the Lock: Use your screwdriver to insert and tighten the screws into the holes. Make sure the screws are tight, but avoid overtightening to prevent damaging the lock or door.
Test the Lock: Try locking and unlocking the door several times. The key should turn smoothly, and the door should lock and unlock without any issues.
Check the Alignment: Use your level to check the alignment. If the lock isn’t level, loosen the screws, adjust the lock, and tighten the screws again.
Clean up: Clean any debris or dust that may have resulted from the installation process. You now have a new Jimmy-proof lock installed.
If you feel unsure at any time during the installation, it’s best to consult with a professional. They have the skills and expertise to handle the installation efficiently and correctly.
REPLACE JIMMY-PROOF LOCK WITH DEADBOLT
The process of replacing a jimmy-proof lock with a deadbolt involves several steps, much like the installation of a new lock. Here’s a guide on how to do it:
1. Remove the Jimmy-Proof Lock: Begin by unscrewing the existing Jimmy-proof lock with your screwdriver. Ensure to keep the screws in a safe place, as you may need them later.
2. Prepare the Door: After removal, clean the area on the door where the old lock was situated. The surface should be dust and debris-free to ensure a secure fit for the new deadbolt.
3. Mark the Deadbolt Position: Hold the new deadbolt against the door at the desired height. Use your pencil to mark the keyhole position and the screw holes onto the door. Ensure the lock is level and straight.
4. Drill the Holes: Drill holes at the marked positions using your power drill and the appropriate-sized drill bit. Always drill straight, and do not force the drill.
5. Insert the Deadbolt: Align your new deadbolt with the drilled holes. Feed the bolt through the keyhole and align the lock.
6. Secure the Deadbolt: Use your screwdriver to insert and tighten the screws into the holes. Ensure the screws are tight but avoid overtightening to avoid damaging the lock or door.
7. Test the Deadbolt: Try locking and unlocking the door several times with the key. The key should turn smoothly, and the door should lock and unlock without issues.
8. Check the Alignment: Use your level to verify the alignment. If the deadbolt isn’t level, loosen the screws, adjust the deadbolt, and then retighten the screws.
9. Clean Up: Clear away any debris or dust that may have resulted from the installation process. You now have a deadbolt lock installed in place of your Jimmy-proof lock.
If you have any doubts or want to ensure the installation is done accurately, it is advisable to enlist the professional services of a local locksmith.
TROUBLESHOOTING COMMON ISSUES WITH JIMMY-PROOF LOCKS
You may encounter a few common issues with your Jimmy-proof lock despite careful installation or replacement. Here’s how to troubleshoot them:
Stuck Key
If you find your key stuck in the lock or is hard to turn, apply a graphite-based lubricant to the keyhole. Avoid using oil-based lubricants, as they can gum up the lock over time. If the problem persists, the lock cylinder may need to be replaced.
Misalignment
The lock and strike plate may be misaligned if the door isn’t locking correctly. Check the alignment and adjust the position of the lock or strike plate as necessary.
Lock Doesn’t Latch Properly
If the lock doesn’t latch properly or the door can be pushed open when it’s “locked,” it may be installed at the wrong height or distance from the door edge. Check the installation measurements and adjust as needed.
Difficulty Locking or Unlocking
If you’re having difficulty locking or unlocking the door, the deadbolt may be too long or too short for the door’s thickness. You may need to replace the deadbolt with one that matches your door’s specifications.
Loose Lock
If the lock is loose, tighten the screws. Be careful not to overtighten them, as this could cause damage.
ALWAYS TRUST PROFESSIONALS FOR YOUR LOCKSMITH NEEDS
At Cobra Locksmith, we always encourage homeowners in New York to trust professionals for their locksmith needs. Though replacing an older locking mechanism like a Jimmy-proof lock with a double cylinder lock or a deadbolt lock can be attempted with the right tools and guidance, there are finer details that professionals handle better. Details such as door frame measurements, ensuring the lock is in a securely locked position when not in use, correct rim cylinder placement, and using the right installation screws all contribute to the proper functioning of the lock.
Replacing a lock involves carefully removing the previous lock, preparing the surface, marking the new lock position, and carefully drilling mounting holes for the lock case and the strike plate. The rim cylinder is then placed, followed by the alignment of the lock strike. Connecting screws are then used to secure the unit.
The back plate and the armored cover are mounted inside and outside the door, ensuring secure access. The supplied key should easily move the deadbolt from unlocked to locked. Professionals also ensure that the door frame is not damaged during the drilling and installation.
Despite all the details being correct, sometimes the new lock may not work as smoothly as expected, or there may be issues with the bolts or the strike plate alignment. In these cases, the original lock or a different lock type may have to be reinstalled until the issue is resolved.
Remember, the goal is to enhance the security of your home by installing a new lock or replacing an existing one. If there is any doubt or confusion, it’s always better to contact professional locksmiths with the skills, tools, and experience to handle the job efficiently and correctly. You can trust Cobra Locksmith to provide reliable, professional, and speedy locksmith services.
 +1 347-797-1671
 info@cobralocksmiths.com
 Connect with us
 Tap Here To Call Us

Comments are closed here.